How to Fix a Cassette Tape That Has Been Eaten or Tangled
The sound wobbles, slows, and stops. The tape comes out trailing a loop of ribbon. Most eaten cassettes can be saved, and here is how.
It always happens in the middle of a song. The sound wobbles, slows, turns to mush, and then stops. You press eject and the cassette comes out trailing a loop of shiny brown ribbon, still caught somewhere inside the player. If it's an old mixtape, one you've had for twenty years, your stomach drops.
The good news is that most eaten cassettes can be saved. The tape inside is tougher than it looks, and with a little patience you can usually get it back in the shell and playing again. Here is how to fix a cassette tape that's been eaten or tangled, step by step, and how to stop it happening again.
First, stop and don't pull
The worst thing you can do is yank the cassette out. When a player eats a tape, the ribbon has usually wrapped itself around the capstan, the small metal spindle that pulls the tape past the heads, or around the rubber pinch roller next to it. Pull hard and the tape stretches or snaps.
Switch the player off as soon as you notice the problem. If it's a car stereo or a deck, turn the power off before opening anything. Then press eject gently. If the cassette comes partly out with tape attached, hold it steady and look inside for where the tape is caught.
Free the tape gently
Using your fingers or a pair of tweezers, ease the loop away from the capstan and pinch roller, a little at a time. If it's wound tightly around the spindle, try turning the spindle slowly by hand in the opposite direction. Take your time here. A few extra minutes now can save the entire tape.
Once the cassette is free, hold it so the open edge faces you and look at the loose loop. Avoid touching the dull side of the tape where you can help it. That's the side that carries the music, and fingerprints leave oil that can cause dropouts later.
Wind the tape back in
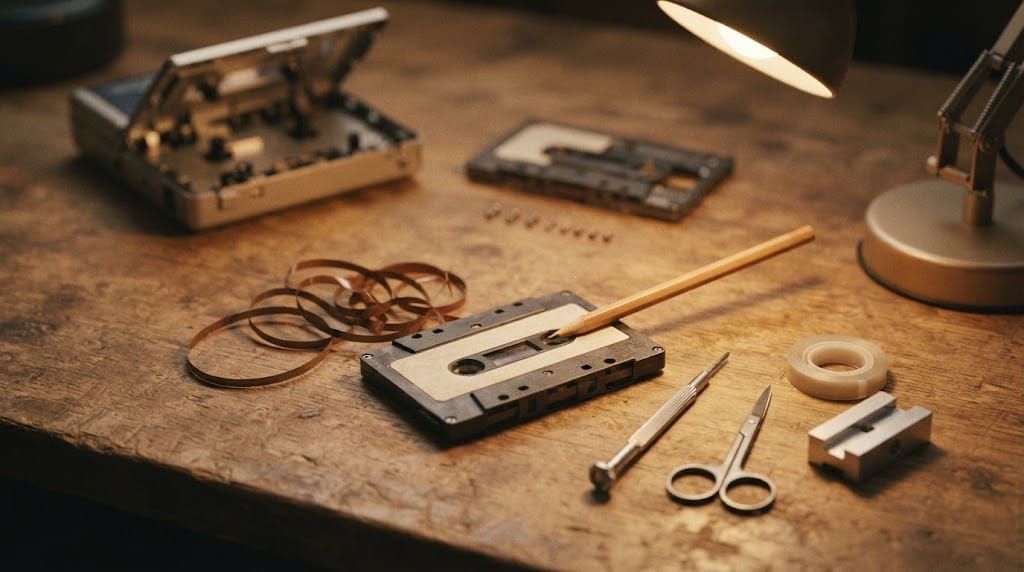
Now you need to take up the slack. The classic tool is a pencil. Push it into one of the hubs and turn it slowly so the loose tape winds back inside. A hexagonal pencil fits most hubs almost perfectly, which is why every teenager in the eighties knew this trick.
Wind until the tape sits taut between the two reels without being tight. Watch the tape as it goes in. If it twists, stop, untwist it, and continue. A twisted section that gets wound back in will cause problems the next time you press play.
Smooth out any creases
Tape that's been chewed often comes out crinkled. Small creases are usually harmless and may only cause a moment of muffled sound. Bigger ones can be eased by running that section slowly between your thumb and finger, holding it gently by the edges. Don't rub hard and don't use heat. The tape is very thin and warps easily.
If a short section is badly mangled, it may be better to cut it out and splice the ends together, which costs you a second or two of music but saves the rest.
When the tape has snapped
A broken cassette isn't the end, either. To join two ends, use proper splicing tape made for cassettes, like this 1/8 inch splicing tape, never ordinary sticky tape. Household tape oozes adhesive over time, gums up the player's heads and can ruin the tape on either side of the join.
Lay the two ends side by side, overlapping slightly and lined up perfectly straight. Cut both at a slight diagonal so the join passes the heads smoothly, then press a small piece of splicing tape onto the shiny back of the tape, not the dull side that touches the heads. Trim any excess so nothing sticks out from the edges. If you plan to repair more than one cassette, a cassette repair kit with a splicing block makes lining up the cut much easier and much more accurate.
If the tape has snapped right at the clear leader at the start or end, the repair is the same, and many kits include spare leader tape for exactly that.
When the shell is the problem
Sometimes the tape is fine but the plastic shell is cracked, warped or simply worn out. If the cassette is held together with tiny screws, a precision screwdriver set lets you open it carefully and lift both reels out together. You can then move them into a new empty cassette shell and close it up.
Note how everything sits before you start, including the guide rollers and the small felt pad behind the tape window, which presses the tape against the heads. Cassettes that are sealed rather than screwed shut can still be opened, but it's delicate work, and for a tape that really matters it may be worth asking someone experienced to do it.
Make sure it doesn't happen again
A cassette player that eats tapes once will often do it again. The usual culprits are dirty heads, a sticky pinch roller or worn rubber parts inside the machine. Cleaning helps more than people expect, and a cassette head cleaner and demagnetizer is the simplest place to start. If the player keeps chewing tapes after a good clean, the rubber parts likely need replacing.
Look after the tapes too. Keep them out of hot cars and direct sun, store them in their cases, and wind them fully to one side before putting them away. Old tape that's been sitting for decades can be more fragile, so play it on a machine you trust first. That gentle care is part of why we keep going back to tape in the first place.
Save the music, too
Once a precious tape is playing again, consider making a copy. Recording it onto a fresh cassette or into a computer means one bad afternoon in a tired player can't take it away for good.
And if the tape is a mixtape someone once made for you, or one you'd like to make for someone else, a new one can be part of the story. A fresh custom cassette with the same songs, a new cover and a note about the original is a lovely way to give an old mix a second life. There's a reason a cassette gift feels more personal than a playlist link, and why so many people still crave the warmth of tape hiss in a flawless digital world.
Some tapes are worth saving. Some are worth making all over again. When you're ready, start creating your own mixtape.